How to Create a Genogram
Creating a genogram is easy, you don't need any special tools, you can even draw them by hand by simply following the rules and symbols found in the related pages. However, using GenoPro you will be able to do so quicker and easier.
GenoPro is the genealogy software that was designed from the ground up to help you create genograms and family trees, simply put there is no better tool.
This guide is a quick walkthrough to get you started with your first genogram using GenoPro.
If you haven't already done so, download GenoPro to get you started into the wonderful world of genograms. You can try it for free.
Steps to create a genogram:
1. Insert individuals. You can insert an individual by clicking on the
New Male  or New Female
 buttons
at the top, by right-clicking on the GenoMap and selecting New Male or New
female, or also by using the shortcut letters W and E. Once the first person is
entered, you may use other buttons to enter individuals who are related to that
person, such as new parents
 , new
mate
  , new
daughter
 or new
son
  .
.
Tip: You can also insert a whole nuclear family at once by
clicking on the Family Wizard
 button and typing in the name of the father, the mother and the children in the
appropriate location.
2. To place individuals in the right location on the tree, right-click on the
individual, and select: Link as child, Link as parent, or Link as mate. This
will provide you with a line that you must link to the other person who is the
parent, child or mate of the first individual. You can also use the same buttons
in the toolbar by selecting the two related individuals. If your family tree is
a little bit messy, try the AutoArrange button .
It will take into consideration the family links and place individuals in the
correct place.
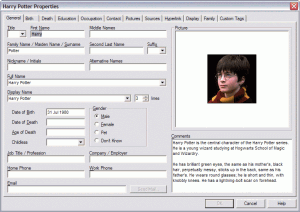
3. Once the symbol is entered, double-click on it and enter the relevant
information you have on that individual such as names, birth date, education,
occupation, contact information, etc. Once you are done, click on OK and do the
same for every individual in your tree.
 GenoPro Individual Properties Dialog Box
4. Add new social relationships by including other individuals who may have
played an important role in the family, such as a nanny, a close friend, a
secret lover, etc. Right-click on a new individuals and select New Social
Relationship
 .
This will provide you with an arrow that you must link to another individual.
Once that is done, click on the arrow to define the nature of the relationship.
Select one from the drop-down menu and customize it with a new color or line
pattern.
5. Add new emotional relationships between members of the family or members
at large. Right-click on an individual, select New Emotional Relationship,
and then choose one of the listed relationships. Again select the other
individual to whom this relationship applies.
6. You can customize the look of the display of each person by clicking on
the display tab in the individual's property window as seen above. Here, you can
change the colors of the symbols, the text, the outline, the fill or the
labels. This can be useful to identify the person around which the tree is
centered, such as yourself, or your client.
7. Continue to add new individuals and new relationships until your tree
reflects the reality of your family. Your genogram should be a colorful
representation of who you are!
Previous: Genogram Rules
Next: Family Relationships in Genograms